Wheat Paste Recipe:
(Sticks well to most things except plastic!)
You will need:
- Water
- White flour (easy blend works really well, but must contain gluten)
- Salt
- Weldbond or exterior (brown) woodworkers glue
- Large mixing bowl
- Storage container (large empty plastic milk or juice carton)
- Long mixing spoon
- Kettle or pot for boiling water
Proportions to use
Mixing in the following proportion works best to cook it properly! So if you are going to need more, make in these proportions and mix together after. Trying to cook this will just burn it to the bottom of the pot, no matter how much stirring and labour.
- 1 litre luke warm water
- ¼ cup of table salt as preservative
- 1 litre all purpose white flour
- 1 litre BOILING WATER
You may decide to leave out the salt as it can react with some of the finishes. If so, just mix a batch as you need it and use it up straight away, making sure it is dried out before mould sets in! If mould does set in, a good spray of common household bleach should correct that, but be very drying on your hands!
How to make the paste
Stir salt (optional) and flour into lukewarm water until well mixed. I use an egg whip by hand but a blender also works.
Pour in BOILING WATER! Stir quickly into the white flour mix. This cooks the paste and activates the gluten.
Allow to cool before using. You can add clove oil, witch hazel or other anti fungal for long storage.
Keep refrigerated and air dry in a dry location as it can go mouldy in dampness. In this desert climate it is best done in the summer months and air dried outside! But I do it indoors all the time where there is dry heat . Remember though there will be humidity released as it dries depending on the size of piece! Watch for mould and wipe with a fungal solution if mould starts to form, usually the salt will inhibit this. Or use some clove oil, witch hazel etc. I have also washed moulding pieces with laundry bleach straight from the bottle.
Note: Add woodworkers glue to the amount you choose to use at any time. 50% woodworkers glue to 50% wheat paste makes a stronger quicker drying substance! You can use this for slabs, strips, fabrics, paper twigs and mush.
Paper Mush
The Vancouver Sun (yes you do need to do research on which of your local papers works best for mush, slabs, twigs etc.) is the best for this process. It makes a wonderful clay-like mush for sculpting and filling in spaces or covering for a wonderful effect. Also colours will vary according to inks in papers so make up a full batch per project if you don’t intend to paint it, then refrigerate until used up! It can be mixed with some bleach if mould starts to grow.
How to make the mush
Tear up into small confetti like pieces, several pages of the paper. Hint: The Vancouver Sun tears best from top to bottom, and I usually tear very narrow strips and then cut with scissors, though tearing is better for the fibre.
Put the cut up paper into a large pot (that you don’t want to use for anything else!) Fill about ½ full with the paper and top up with water. Now boil the heck out of it and stir until you have a grey paper pulp. Pour into a towel and hang to drain. When cool you can squeeze out the remaining water and break it up into a large mixing bowl. Add the wheat paste/woodworkers glue to it, mash it and knead it. It should be a non sticky but clay-like consistency. Now create away, but not too thick - one layer at a time!
Slabs
Just about any non gloss newsprint will do for this - glossy can separate. Depending on the size of your creation of course, but I usually start with full sheets of paper. On a flat, smooth surface lay out one full sheet of newsprint and cover with wheat paste/glue mix. Spread evenly with your hands (yes, your hands!). Carefully lay on a second sheet starting at the top, as if applying wallpaper. Smooth down and out, applying more paste/glue mix and smoothing out the layer, expelling any extra paste from between the sheets by smoothing outwards. Repeat a minimum of 9 times, better still 12 to 20 times, depending on structural use! Now you have a leather like slab you can mould into or around just about any shape. You can tear it, cut it to shape, fold it, or roll the edges. Remember to wrap any mould you are using in plastic unless you want the slab to stick to it (e.g. if applying it to a glass or plastic cup for use as a vase or planter). Let it rest once you are happy with the shape, but not dry if you are applying things to it, like embedded objects or driftwood etc. Once you are completely happy with your piece other than maybe draping, beading or finishing, let it dry thoroughly.
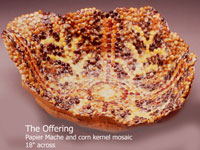
- The Offering - Made of a single slab, 20 layers of newsprint full size sheets, laid into a hollow mould, twisted then torn around the edges. Decorative pieces of the cut slab were used to raise a detail on the outside of the bowl during its leather stage. Corn mosaics were glued into place after drying and then a polymer resin was poured over to seal and protect the mosaic.

Twigs
Twigs are fun for framing, coil building (just like clay) structures, wrapping, raised patterns, or for wherever your imagination takes you. Start as for a slab - a whole sheet of news print. Apply paste/glue, then fold in half lengthwise, applying paste/glue to the new surface and smooth out air bubbles and excess paste from first layer, fold again and repeat the process to about 1" thickness. With more paste applied, gently twist the length into a twig or rope shape and store it in a plastic bag while you make however many more you are anticipating needing for your project. The great thing about papier mache is that you can always add more even after it dries so don’t worry about being too precise. The bad thing about papier mache is that every page and/or mache mix will be a slightly different colour due to inks, but if you are staining or painting, who cares! Store each twig in the plastic bag and store in a fridge for later use if necessary. You can now use the twigs to make a coil pot, vase, box, make a raised pattern on an existing piece, or just weave for a fun effect or whatever. Weave with real twigs, ribbon or again, I invite you to use your imagination!

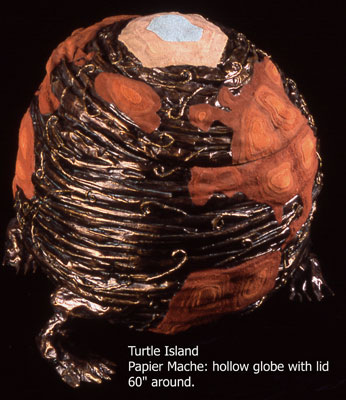
- Turtle Island - 48 inches around, all of coiled paper twigs, like making a hand-built coiled pot. The frame was a beach ball and the lid was kept separated during drying with recycled plastic bags. The finish is sand-painted on with crushed sandstone and white sand, as well as faux acrylic bronze painting. The continents and the directional current arrows were layered on after the framework had dried, from cut out paper slabs and small paper twigs.
Strips
Strips we have all done. Remember balloon piñatas? So Vancouver Sun is again best for tearing, but different papers will have their own grain so find which direction tears best and use it to your advantage. You want strips about 1 to 1.5 inches thick and about 6 to 8 inches long. You can always shorten as you need to and even tear thinner as you apply in tight areas. For this you need a structure of some kind - cardboard, chicken wire, balloon, or pre-existing mould (usually halved for reuse, once each side is dry you remove from mould, place sides together and use more strips to close the seam).
Now you have come this far try using fabric, seaweed (well rinsed first), photos, grasses, dry softened leaves and dried flowers, coloured threads, natural threads… and on and on it goes. Let your imagination run wild!
Acrylic paints are best for painting, while oil based varethene or linseed oil are best for finish coats. You can use wood stain, tea, or instant coffee for staining! Basically treat papier mache work as you would a piece of wood you are finishing - sand it, stain it, oil it, paint it, tattoo it!
My latest find is using an exterior masonry sealant (miracle sealer, silicon rubber). This blends really well with other finishing products and adhesives on sand covered pieces. It allows the sand to look real (like sandstone) and at the very least makes it water resistant. I haven’t used this much on pottery type pieces as it leaves a very rough finish that can hold bits of food etc. I use an exterior (usually) matte urethane on bowls and such.
Have Fun and remember to clean up really well after each session as this stuff really sticks.