Introduction
I believe in using all recycled materials during the creation of my pieces, so you will find that I only ever use cardboard for the armature. It is an extremely strong material if manipulated properly.
Generally, you can use any cardboard boxes from around the home to cut up and use but, for larger pieces of furniture, I mostly go to retail outlets and ask for the larger cardboard sheets they usually just throw away. Once they get to know you, they are usually helpful and will keep them for you on a regular basis. These larger sheets make it easier to cut multiple numbers of the same pattern as you will see as we go along.
As for the paste, paper strips and pulp recipes, you will find those here on this site. I would also recommend you use a good craft knife for cutting shapes in cardboard. It gives a better, cleaner edge than scissors.
You will need
- Large cardboard sheets
- Sharp craft knife
- Strong adhesive tape
- Newspaper
- Strong adhesive
- Staple gun
- Pencil
- Clear waterproof exterior varnish
Let's begin
Cut out 12 circles from cardboard all exactly the same size (choose to use a different shape if you wish - these are for the base and seat). The size of the circles will depend on how large a pedestal throne/chair you want to make; my circles were 41cm in diameter each. When finished, using a strong adhesive, stick the circles together in multiples of three, so you will eventually have four separate yet much stronger circles. Let these dry thoroughly.
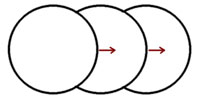
- Combined circles
Cut out a long piece of cardboard. Again, the size here will depend on the size of the item you're making; mine was 38cm in height and the length varied, depending on the size of cardboard being used. Roll the cardboard as tightly as possible, as in the diagram.
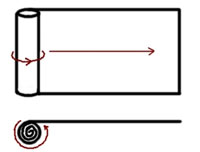
- Roll tightly
You can add more sheets of cardboard if you feel it is necessary as you go along to make the tub fatter. I would suggest you use a strong adhesive tape to attach each piece as you progress. Then, when you have the finished tube, use more tape so it will not unravel. The finished tube should look like this.
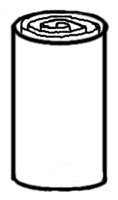
- Rolled up tube
Take two of the combined circles from the first step, and place the tube you have just finished in the middle of each circle. Use a pencil to draw around the tube on to the circles. Now, cut these inner pieces out. You will find a craft knife allows you to do this faster and give a cleaner edge. Be careful not to damage the rings that you should be left with. When finished, as in the diagram shown, attach the rings individually to the other two remaining circles using a strong adhesive. Leave to dry thoroughly.
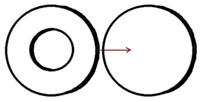
- Making the ends
Fit the tube and circles together as shown in the diagram. The tube should fit snugly into the rings you cut out earlier. If you wish, you can use more adhesive when fitting these pieces together.
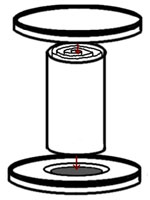
- Taking shape