Philosophy
First of all, a bit of artistic philosophy: as an artist, you have no obligation to your audience; your only obligation is to your muse. The reason for this is that almost all audiences contain at least one critic; some audiences are composed entirely of critics. Your inspiration comes from the muse, not the critics. If you think the inspiration is peculiar, don't worry, just do the thing as faithfully as you can to the vision you have of it. Every true work of art will find its own audience, but if you compromise the work, it won't be true, and you won't be happy with it.
Introduction
When you start an animal project, get as many photos as you can find of the animal, so you can study its proportions and structure. Do this even if you don't intend it to be very realistic; you have to know the rules before you can get away with breaking them.
You will need:
- Plastic hand lotion bottle
- Wire
- String
- Newspaper
- Masking tape
- Block florist's foam
- Paper clay
- Stiff plastic tubing
- White emulsion paint
- Silicone sealant
For information and suggestions for the eyes, shoes, mane, tail tuft and finishing details, see "A few notes on the details" at the end of the tutorial.
Beginning
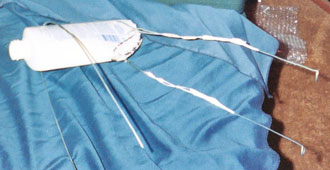
The body is built around a hand lotion bottle which has been modified. Here you see that I have cut out a portion of the bottom. I stuffed a rag into it so the cut would show up well in the photo.
The reason for this cut-out is that an animal's body tapers behind the ribs; this cut-out reflects that shape.
I closed the cut by stitching it with string. The result was a little uneven, but that gets fixed in the final shaping with paper.

- Base for body
- Building the legs
This photo shows the wires I put through the bottle to serve as legs. Notice that there are two wires at the back end; I also used two at the front. This gives extra stiffness to the legs and keeps them from swivelling about while you work on the project.
Another view, this time with the wires of the rear legs bent into shape. Notice that only one wire runs the whole length of the leg; the other goes only about halfway.
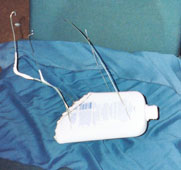
- Rear legs
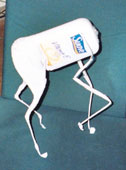
For some reason, I removed the front wire while working on the back legs. Here I've begun to build up muscle on the legs.
Cut a piece of newspaper into a square and roll that into a cone shape, with a corner of the square becoming the point of the cone. Make it several sheets thick, adjust the width of the cone, and tape it together. Then flatten it against the sculpture, trim with scissors if needed and tape it in place.
Here I've added the front legs. Notice the added buildup of contour on the hind legs.
- Front legs

- Rear view
Rear view at about the same stage of progress.
At this point, the legs are all pretty well fleshed out. Notice that I've had to add some additional material to the body to fill out the chest. This was a piece of the green foam used later for the neck and head.
It looks a little creepy without a head!
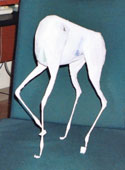
- Creepy!
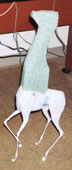
- Foundations for the head
This is what I did for a foundation for the head and neck. This is a block of that green foam that florists use for dried or silk flower arrangements. I shaped the end of it to fit tight against the body and glued it on with silicone adhesive/sealant.
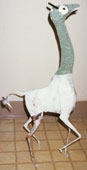
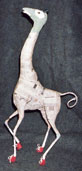
Lots of changes here. I've shaped the neck and head and added the eyes, horns and tail, and begun to apply papier-mâché. The white stuff around the eyes and the jaw is an air-drying material called paper-clay. The horns are lengths of stiff plastic tubing. Notice the tail tuft, which at this point is made of feathers. I changed it later.
- Shaping the head
- Finishing the legs
Here he is with the shoes. I determined that they needed to go on early, to avoid damage to other delicate details of the head and neck, so I finished the lower legs complete to the final paint job.