Boston Terrier
Introduction
This tutorial is dedicated to Dorothy who sadly lost her Boston and wanted to make one.
You will need:
- Newspaper
- Masking tape (1 inch wide)
- Wallpaper paste
- Sa papers
- White rice paper
- Plastic craft eyes
- Water based satin varnish
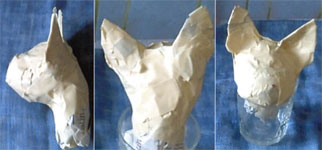
Making the head
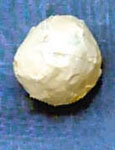
- Head
Tear pieces of tape and stick the corners to the work table edge so they look like items of washing hanging on a line. Take pieces of tape as you need them and replenish as required.
Make a ball shape by scrunching up a piece of paper and taping it. Now add more small scrunches until the ball is the size you want.
Making the ears
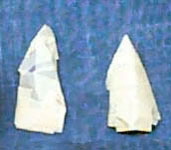
- Ears
Make 2 triangles for the ears and tape them. Don't worry if they're too big, you can trim them once they're in place. Add the little nodes to the bottom of the ear by using bits of tape until you get the right shape. The ears are very distinctive.
Lightly attach the ears with tape to the middle of the top of the head - not the back of the head. Use tiny scrunches and tape to build up the thickness of the ear and attach firmly to the head. Trim the ears to shape and re-tape the cut edges.
Making the neck
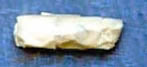
- Neck
To make the neck, take a half sheet of paper and roll it into a sausage shape. Now fold the sausage in half and start to twist it all the way along and tape it so it is fixed in the twisted shape. This adds strength.
Joining the neck to the head
Place the neck at the back of the head and tape it on thoroughly using long strips. Add appropriate size scrunches to the neck and the back of the head so the neck is very firmly attached to the head.
To do the dog's muzzle, you will need photographs of a Boston Terrier - one full face and one profile. Checking constantly with the photos, start to add small scrunches halfway down the face and build up the shape. Don't worry if your dog looks a bit like a pig at this stage as this often happens. It'll come right in the end, I promise!
- Where head meets neck

Making the body
To build up the body, (this is to be a sitting up dog), make larger scrunches and tape them to the bottom of the neck. Add more scrunches and start to elongate the body. Tape each scrunch very firmly. Build up the back of the head with small scrunches and tape.
Get the body firmly attached to the head and neck using scrunches and tapes. Twist the head so it's slightly cocked to one side and looking up. Next you need to add more tiny scrunches at the front and back of the neck to tidy up where you twisted.
Keep going until the dog's body length looks the right size for the head. In other words it looks in proportion, you have to use your own judgement here. You can rip bits off or add bits as required. Make him a little bigger across the shoulders, although when we add his two front legs his chest will expand nicely.
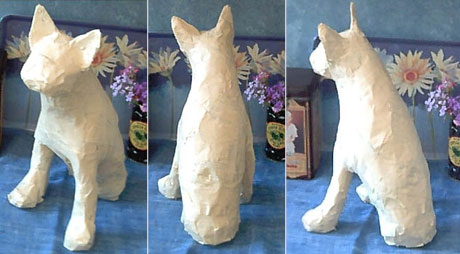
Keep checking your dog against a good photograph in the pose you're making. At the end of the last stage my dog looked a bit like a pig. At this stage he looks like a mummified Egyptian cat, but have faith! I promise he'll come out looking like a Boston Terrier! Have fun, it's really not hard. Just know that you can do it. If it doesn't look right, leave it awhile and come back and fiddle with it and put bits on and take bits off until it does look right.
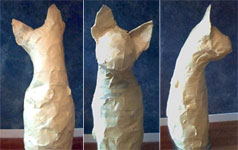
- Taking Shape
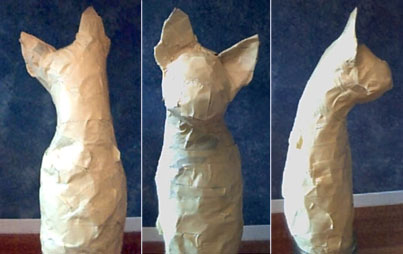
Adding the front legs
Firstly, check that you are sure your dog's body and back is long enough for you to put the legs on. Then take a long sheet of paper and roll it into a sausage shape. Fold it in half, twist it down its whole length and tape each twist so it stays fixed. This adds strength. It looks awful at this stage resembling a bone, but you're going to add lots of small scrunches to flesh it out. Hold your 'bone' against the dog with the foot end on the table top and trim it to fit. Leave enough length that you can tape it securely on to the chest or the flanks of your animal, leaving an extra inch at least on the length you actually want the legs to be.

- Tail
Tape the leg on to the chest, or the shoulder at the side if the dog is standing up. Tape under and over and across. Add small scrunches all down the leg until the leg is shapely and the right thickness. Have one leg a little further back than the other to suggest movement. Put big scrunches on the chest or the shoulder. This will both fix the legs on firmly and start to define the shape of your animal's shoulders and chest.
A boston is a bulldog and terrier mix and will have a strong chest and shoulders and a thickish bulldog neck. Just keep adding or ripping bits off until you're happy with it. Press bulging bits down and tape them. Fill in dents and hollows you don't want with tiny scrunches, or just small bits of tape.
Making the feet
To make a foot, roll a small ball of paper and tape it. Attach it to the front of the leg. Make sure it lies flat on the table. Start to add tiny scrunches at the sides, the top, the back and underneath to give you a nice little paw shape. Make it slightly broader at the front.
Turn one paw inwards to give the dog a gauche look. These little touches add charm to the finished dog. I don't define the toes but you can if you want to but don't ask me how! Go and have a cup of tea and leave it for half an hour or more and when you come back you'll see where you need to add or remove bits.
Build up the back of the dog. Get the length right - only you can judge that, but if it's a sitting up dog one good way to judge the length of the back is correct is to stand the dog on his front paws as if he was going to walk. If the back's too short it will be glaringly obvious. I'd already got my legs on and discovered the back wasn't long enough, so before I put the feet on I added more to the length of the back. I then added several small scrunches to the end of the legs and taped them very thoroughly before adding the feet.
Keep the dog's hips and bottom narrow at this stage, don't make them too broad. When we tape on the back legs and the 'muscle', it increases the hips quite a bit.

- Feet