You are not logged in.
This is my first paper mache project ever. I need a little help with the smoothing process while still keeping that rugged, authentic look.
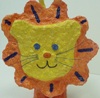
Here is the original mask that I'm hoping to replicate:
http://i87.photobucket.com/albums/k129/ … namask.jpg
Here is my base pre-mache:
http://i87.photobucket.com/albums/k129/ … emache.jpg
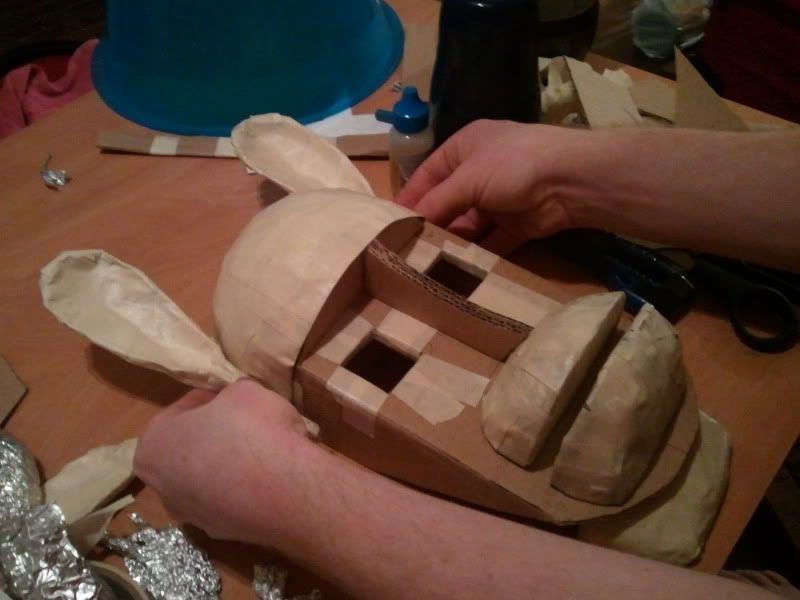
I used straight liquid starch and the project set up quite well. Here is the mask after my first paper mache. I kept the ears & the muzzle separate then paper mache'd them onto the mask tonight (it's still drying). Basically I want to keep that rugged "hand-carved" look, but get rid of any major imperfections. Do you think a light sanding is going to work for this or do I need to do more? Just not sure how good or not good it is as this is my first time to mache.
http://i87.photobucket.com/albums/k129/ … drying.jpg
Thanks in advance for any advice! This project is due Wednesday so I have to get busy painting it ASAP.
Offline
Also, I am planning to use a faux granite painting technique. Any other ideas to achieve the original look?
Offline

Your work looks really good. Your technique is admirable.
Suggestions - light sanding is enough;
faux granite??? I would use a very fine pulp but if it is to be finished for Wednesday (tomorrow???) you won't have time. The result of this would be something like stone. I have incorporated extremely finely ground egg shell, which gave something of a granite effect when fine sanded. Perhaps just painting is the answer.
DavidO
(David Osborne in gallery)
Offline
Yeah, not enough time in the day! I have to paint it this evening. Really not sure what method to use but I love the egg shell idea.
Thank you for the compliments. I don't think I will ever paper mache again haha.
Offline
I don't believe you. Soon you should have your own gallery. Wait until you get the praise for this piece of work!
Offline
First paint the piece all over black or a dark brown -- this won't show through much, but will give depth to the rest of the coats of paint. (Let this dry -- quick if you put it in front of a fan. I use latex house paint, but acrylics would be fine too).
Example photo -- these are pumpkins because that's what I made recently -- but the technique is the same. : ):
https://picasaweb.google.com/lh/photo/n … directlink
Next dry brush the piece with white or off white. (Take a dry brush, dip the tip in paint, dab on paper towel to get most of the paint off, then dry brush the paint on the mask. This highlights the textures of the piece. -- More paint on the high areas, less paint on the lower ones.) I like a lot of dry brushing. Some people go for less.
Example photo: https://picasaweb.google.com/lh/photo/c … directlink
Then I'd use a series of paint thinned with glaze or water. (I, personally, have more luck with glaze than water.) The glaze I use is just a basic Behr Faux Glaze from Home Depot.
I'd probably start with 2 parts glaze to 1 part paint. Then build up. You could go with more paint (maybe even almost straight paint) on the reddish brown and black sections. Again my paint tends to be little craft acrylic paints.
Example photo, again, a pumpkin, so it's orange: https://picasaweb.google.com/lh/photo/F … directlink
I also put a glaze coat (2-3 parts glaze to 1 part paint) of burnt sienna over everything. I love the way it adds just the right depth and color -- makes things come alive for me.
Actually for the mouth you might not even need to dry brush it (depending on the look you want) ... After the black base coat has dried (needs to have really dried for this to work), do an antiqueing technique and paint the reddish brown over the the whole mouth and then right away wipe it off with paper towel or cloth. The reddish brown should stay in the crevices. This needs to be quick tho -- if the black paint isn't fully dry/cured, it can come off too when you wipe the brown paint off.
You should be able to come pretty close to the mask, with these techniques tho. Painting with slightly transparent paint (glazed or watered) will help you get the depth of color the mask has.
Stolloween has info about drybrushing as well if you want to read someone else's take on it. I suspect there are bunches of you tube videos as well.
The key for me is doing it with a really dry brush -- put too little on to start, rather than one big brush-shaped glob of white paint.
The next key is to dab the glaze/paint on -- enough to get the color you want, not so much that you obscure the shadows/shading underneath. Start with less (tho if you put on too much you can wipe it off before it dries). Some paints go on more transparent and get more opaque as they dry. Paint a layer. Put it in front of a fan. Walk away for 10 minutes (or paint something else) -- come back -- add more if it needs it.
I find it better to work from dark to light (so a darker glaze color then the lighter ones) ... but my final coat is always the burnt sienna. : )
Enjoy! You did a great job capturing the form of the mask. And beware, papier mache can be a little bit addicting. : )
-- b
Offline
Wow, b! Amazing job on those pumpkins. I'm definitely going to give this method a try. I just bought little craft paints. Is your glaze burnt sienna? Tbh, I dont even know what glaze is! Lol.
Offline
That is looking very good! It's hard to believe it is your first effort. You must be a natural.
If you're getting it back after the due date, you can always rework the surface technique. That's one of the great things about PM: If you don't like it in black with white spots, you can change your mind and make it blue with red stripes!
I would like to see how you finish it... (hint, hint).
Sue
Offline
This may be too late, but glaze is basically clear paint base without color. So it 'waters' down your paint without changing the consistency of it. Which makes it more transparent.
And I buy the burnt sienna in a little craft paint bottle, then add a bit of it to plain glaze.
I'd also like to know how it turned out. : )
You did a great job with constructing the shape! I agree you must be a natural. You've clearly got a great eye for these things.
-- b
Offline
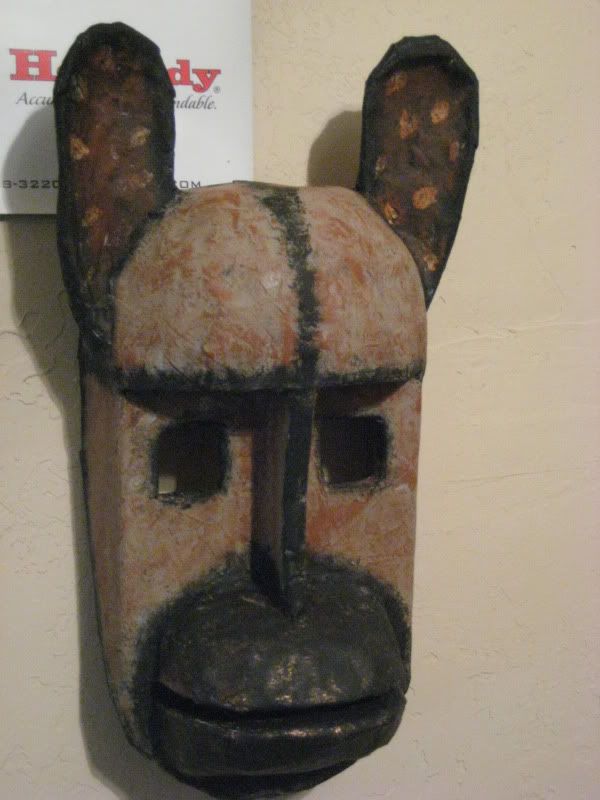
I'm back! Finally! Had some major authentication issues that I had to sort out with the amazing Russ. He got it all resolved and now I can post a photo of how I presented the mask. I may still do some more painting to it. I don't know at this point. I am trying to figure out what to do with it.
I may not display it so adding more paint may not be important.
The photo doesn't do it justice. I couldn't seem to get a photo that made it look quite right.
The final:
http://i87.photobucket.com/albums/k129/ … ask004.jpg
Offline
That is very, very good!
It's hard to believe that this was your first-ever project!
Sue
Offline

It is very good as Sue says, and I notice it started with a very good armature, this is my downfall, not enough preparation in the first place. Well done Kriskoeh, I have learnt from you already. As usual thanks to all the contributors too I am always learning from you people, thanks and MERRY CHRISTMAS to you all.
Lesley.
Offline
You did a most impressive job with this 1st time mask project Kriskoeh. I could not help but see what it looked like if the picture you posted had more contrast, saturation etc.
I hope you don't mind but I took your photo and ran it through some "post production" adjustment with the free and amazing image viewer IrfanView! Indeed your effort looks GREAT! I also flipped it so it is looking in the same direction as the original.
The results of that 2 min tweak are below:
http://i320.photobucket.com/albums/nn34 … ehMask.jpg
Last edited by Pelletor (2012-02-26 09:18:40)
Offline
Great job!
Offline